
by Gina Hilberry, AIA; Cohen Hilberry Architects; Elizabeth Hilton, PE, TxDOT; William Prosser, FHWA; Lukas Franck, The Seeing Eye
Introduction
The purpose of this section is to illustrate the basic elements comprising the public right-of-way and look at the sidewalk environment as a whole. To effectively design and/or alter the public right-of-way, the components must be analyzed in relationship to each other. The inter-relationships of existing slopes and objects, vehicular demands, timing requirements, and pedestrian needs can create a challengingt design context.
 | |
|---|---|
|
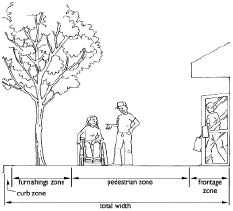
This illustration from “Designing Sidewalks and Trails for Access” shows the divisons of sidewalk width by function—furnishings zone, pedestrian zone, and frontage zone. |
In many jurisdictions, the right-of-way is divided into four zones: the frontage zone, the pedestrian zone, the furnishing zone, and the curb zone. The frontage zone is the strip along the inside (non-vehicular) edge and is frequently the location for signage, building-related construction (e.g. ramps, walls, and entries) and other pedestrian amenities. The pedestrian zone includes the PAR as described below. The furnishing zone is adjacent to the curb line and is the location most frequently used for bus stops, parking meters, utility connections, light poles, and similar appurtenances. The curb zone is literally the top of the curb.
Understanding the terminology and the requirements that relate to each of the major components of the pedestrian environment is the first step toward development of a successful design system that addresses the public right-of-way as a whole. The components that are illustrated in this chapter include:
- Public right-of-way: land or property, usually in a corridor, that is acquired for or devoted to transportation purposes.
- Sidewalk: that portion of a public right-of-way between the curb line or lateral line of a roadway and the adjacent property line that is improved for use by pedestrians. Total sidewalk width is the surfaced (paved) area measured from back of curb to right-of-way line.
- Curb line: a line at the face of the curb that marks the transition between the sidewalk and gutter or roadway.
- PAR: an accessible corridor for pedestrian use within the pedestrian zone of the public right-of-way. The PAR is the path that provides continuous connection from the public right-of-way to building or property entry points, parking areas, public transportation, and/or other destinations. This route should be firm, stable, and slip-resistant and should comply with maximum cross slope requirements. All transitions (e.g. from street to ramp, ramp to landing) must be flush and free of changes in level. The PAR should be at least four feet wide, although five feet is preferred since it provides adequate space for two pedestrians to pass and space for two pedestrians traveling in the same direction to walk side-by-side. A five-foot PAR width eliminates the need to provide passing areas at 200-foot intervals and is a more comfortable walking environment. For many users, a path of reduced vibration significantly increases the accessibility of the environment. Decorative pavers, beveled edges, and other surface treatments can create a painfully bumpy surface and are best used at edges. The PAR should also be free of obstacles and protrusions.
- Detectable warnings: a surface feature built in or applied to walking surfaces or other elements to warn of hazards on a circulation path. The warning feature should be six inches back from the curb line, at least 24 inches deep and extend over the entire side-to-side surface of the ramp or blended transition. The pattern and spacing of the detectable warning surface is described in section R304 of the Draft PROWAG. The detectable warning surface must be in visual contrast to the surrounding ramp surfaces.
-
Curb ramps: short ramps cutting through a curb or built up to it. The locations and shapes of the ramped surfaces define the types that are generally used. Ramp edges may be either flared or returned, although if edge returns are used, the adjacent surface should not be a pedestrian circulation path. Ramps have four-foot by four-foot landings at top and bottom, although five-foot by five-foot is preferable. Ramp flares can not be considered part of the PAR.

Parallel curb ramps have the running slope parallel to the curb line.

Perpendicular curb ramps have the running slope perpendicular to the curb line.

Blended transitions are situations where either the entire sidewalk has been brought down to the street or crosswalk level or the street has been brought up to the sidewalk level.
Combinations of these types of ramps can be used effectively. For additional examples of the shapes and combinations, see Chapter 6, Curb Ramp Examples. The models that are presented in this chapter begin with an illustration of a nearly ideal 15- to 20-foot-wide sidewalk section in an urban area. The width of the right-of-way permits easy development of a five-foot-wide PAR with plenty of area left for bus stops, outdoor furnishings, tree areas, accessible parking, utility poles, hydrants, and other elements. The width of the PAR is constrained in each succeeding model illustrating typical relationships of the same elements in 12-foot, 8-foot, and 4- to 5-foot-wide pedestrian zone conditions. All sidewalks are measured from the back of the curb to the edge of the right-of-way. These illustrations are not intended to be an exhaustive analysis of all possible solutions to the problem posed by narrow right-of-way conditions, but rather to begin the process of suggesting
alternates and methods for prioritizing improvements.
Case Study—Wayfinding at Roundabouts
- In this conversion to a roundabout, landscaping separates and delineates the pedestrian route, providing guidance to the crosswalk location for pedestrians who are visually impaired.
- Detectable warnings are correctly installed in pairs, clearly defining the pedestrian refuge space at the splitter island.
- Crosswalk is well-marked for contrast (although its brick surface will be high-maintenance.)
 |
 | |
|---|---|---|
Case Study—Parallel Curb Ramps and Road Grade
 The parallel curb ramp shown was placed into a sidewalk/roadway with an existing grade of approximately 4%. The design thus called for a longer uphill ramp run from the central landing than required for the downhill ramp run to achieve acceptable ramp slopes.
- Both ramp runs slope at 8.3% maximum. On a steeper roadway, it may be necessary to limit the longer ramp run to avoid ‘chasing grade' indefinitely. PROWAAC suggests 15 feet as a practical limit.
- Still needed: detectable warnings
MODEL SIDEWALKS
15- to 20-foot Curb to Right-of-Way Line

1. PAR (Pedestrian Access Route)
- 4-foot-wide minimum, 5-foot width recommended.
- Set PAR back from curb to allow for street furnishings and pedestrian comfort.
- Set PAR back from building face/right-of-way line.
2. Utility Pole/Street Light
- Locate between curb and improved area, well outside PAR.
- Locate outside the recommended horizontal clearance to obstructions, 18 inches from face of curb minimum.
3. Utility Meter/Underground Vault/Manhole
- Locate outside PAR in furniture or frontage zones.
- Grates and covers should comply with surface characteristics guidelines if located within the pedestrian circulation path.
4. Hatch (At-grade Access Door for Deliveries and Access to Building)
- Locate between PAR and building in frontage zone.
5. Fire Hydrant
- Locate outside PAR, typically in furnishing zone.
6. Accessible Parallel Parking
- Locate in most level area of block (recommended practice) to maximize usability.
- Provide 8 feet of space with 5-foot minimum obstruction-free access aisle adjacent to space for parallel parking.
- Curb line shifts toward right-of-way to accommodate access aisle.
- Space and access aisle should have smooth surface for lift deployment. Minimize cross slope for lift operation.
7. Parking Meter for Accessible Space
- Locate at head of space or other nearby area with accessible connection to PAR and access aisle.
- Instructions visible from 40-inch height at center of clear approach area.
- Coin drop at 48-inch maximum height.
8. Clear Approach Area
- Minimum 30-inch by 48-inch obstruction-free
area centered on object being used (e.g. meter, phone). - Slope area less than 2% in all directions.
- Space should be firm, stable, and slip-resistant.
9. Curb Ramp
- 4-foot-wide (minimum) ramp.
- 1:12 maximum grade on ramp.
- Connect to PAR and to access aisle.
- Provide side flare at 1:10 maximum on both sides of curb ramp where adjacent to improved surface. A returned curb can be used where the curb ramp is adjacent to landscaping other than non-walking surface. No detectable warning is used where ramp connects PAR to an access aisle or other non-vehicular surface.
- Landing can overlap PAR.
10. Driveway
- Maintain PAR elevation across driveway.
- Provide good visibility and sight distance for pedestrians and vehicles.
- Detectable warnings at the pedestrian crossing should be provided only if driveway or alley is signalized.
11. Tree
- Avoid species known to produce surface roots, which may buckle sidewalk.
- Keep tree grates clear of PAR.
- Trim low hanging limbs to avoid creating protruding objects (hazardous especially to visually impaired pedestrians). Use species that do not obstruct sightlines for pedestrians and vehicle operators.
12. Bus Stop and Shelter
- Provide bus boarding and alighting area 5-feet-wide by 8-feet-deep (minimum from curb) for lift deployment.
- Connect waiting and boarding areas to PAR.
- If there is a bench, provide a 30-inch by 48-inch clear approach area adjacent to the bench and connected to bus boarding and alighting area.
- Keep signage from protruding into clear approach areas and/or PAR.
- Provide raised and Braille characters for route identification only (schedules, timetables, and maps are not required to have raised and Braille characters).
- For all signage (including schedules, timetables and maps) comply with current ADAAG for finish and contrast, case, style, character proportions and spacing, and stroke thickness.
13. Landscaping
- Maintain appropriate sight distances. Use low ground cover and similar plantings so as to not obstruct sightlines for pedestrians and vehicle operators.
14. Sidewalk Furnishings, Trash Receptacle, and Similar Items
- Locate outside PAR.
- 30-inch by 48-inch clear approach area adjacent to benches and tables connected to the PAR.
- Trash receptacle openings within reach range requirements.
15. Telephone
- 30-inch by 48-inch clear approach area that may overlap with other clear spaces.
- Provide phone that complies with TTY and is accessible to wheelchair users.
16. Bike Rack
- Locate outside PAR.
- Orient so bikes on rack are not encroaching on PAR.
MODEL SIDEWALKS
12-foot Curb to Right-of-Way Line

1. PAR (Pedestrian Access Route)
- 4-foot-wide minimum, 5-foot width recommended.
- Set PAR back from curb to allow for street furnishings and pedestrian comfort.
- PAR is adjacent to the building face/right-of-way line (no frontage zone).
2. Utility Pole/Street Light
- Locate between curb and improved area, well outside PAR.
- Locate outside the recommended horizontal clearance to obstructions, 18 inches from face of curb minimum.
3. Utility Meter/Underground Vault/Manhole
- Locate outside PAR in furniture or frontage zones.
- Grates and covers should comply with surface characteristics guidelines if located with pedestrian circulation path.
4. Hatch (At-grade Access Door for Deliveries and Access to Building)
- Offset PAR as needed to provide minimum 4-foot path around the hatch.
5. Fire Hydrant
- Locate outside PAR, typically in furnishing zone.
6. Accessible Parallel Parking
- Locate in most level area of block (recommended practice) to maximize usability.
- Provide 8 feet of space with 5-foot minimum obstruction-free access aisle adjacent to space for parallel parking.
- Curb line shifts toward right-of-way to accommodate access aisle.
- Space and access aisle should have smooth surface for lift deployment. Minimize cross slope for lift operation.
7. Parking Meter for Accessible Space
- Locate at head of space or other nearby area with accessible connection to PAR and access aisle.
- Instructions visible from 40-inch height at center of clear approach area.
- Coin drop at 48-inch maximum height.
8. Clear Approach Area
- Minimum 30-inch by 48-inch obstruction-free area centered on object being used (e.g. meter, phone).
- Slope area less than 2% in all directions.
- Space should be firm, stable, and slip-resistant.
9. Curb Ramp
- 4-foot-wide (minimum) ramp.
- 1:12 maximum grade on ramp.
- Connect to PAR and to access aisle.
- Parallel-type ramps required due to limited available right-of-way width.
- Landing can overlap PAR.
10. Driveway
- Maintain PAR elevation across driveway.
- Provide good visibility and sight distance for pedestrians and vehicles.
- Detectable warnings should be provided only if driveway or alley is signalized.
11. Tree
- Avoid species known to produce surface roots, which may buckle sidewalk.
- Keep tree grates clear of PAR.
- Trim low hanging limbs to avoid creating protruding objects (hazardous especially to visually impaired pedestrians). Use species that do not obstruct sightlines for pedestrians and vehicle operators.
12. Bus Stop and Shelter
- Provide bus boarding and alighting area 5-feet-wide by 8-feet-deep (minimum from curb) for lift deployment.
- Connect waiting and boarding areas to PAR.
- If there is a bench, provide a 30-inch by 48-inch clear approach area adjacent to the bench and connected to bus boarding and alighting area.
- Keep signage from protruding into clear approach areas and/or PAR.
- Provide raised and Braille characters for route identification only (schedules, timetables, and maps are not required to have raised and Braille characters).
- For all signage (including schedules, timetables and maps) comply with current ADAAG for finish and contrast, case, style, character proportions and spacing, and stroke thickness.
13. Landscaping
- Maintain appropriate sight distances. Use low ground cover and similar plantings so as to not obstruct sightlines for pedestrians and vehicle operators.
14. Sidewalk Furnishings, Trash Receptacle, and Similar Items
- Locate outside PAR.
- 30-inch by 48-inch clear approach area adjacent to benches and tables connected to the PAR.
- Trash receptacle openings within reach range requirements.
15. Telephone
- 30-inch by 48-inch clear approach area that may overlap with other clear spaces.
- Provide phone that complies with TTY and is accessible to wheelchair users.
16. Bike Rack
- Locate outside PAR.
- Orient so bikes on rack are not encroaching on PAR.
MODEL SIDEWALKS
8- to 9-foot Curb to Right-of-Way Line

1. PAR (Pedestrian Access Route)
- 4-foot-wide minimum, 5-foot-width recommended.
- Set PAR back from curb to allow for street furnishings and pedestrian comfort.
- PAR is adjacent to the building face/right-of-way line (no frontage zone).
2. Utility Pole/Street Light
- Locate between curb and improved area, well outside PAR.
- Locate outside the recommended horizontal clearance to obstructions, 18 inches from face of curb minimum.
3. Utility Meter/Underground Vault/Manhole
- Locate outside PAR in furniture or frontage zones wherever possible.
- When in the sidewalk area, grates, and covers should have firm, stable, and slip resistant covers that are free from level changes.
4. Hatch (At-grade Access Door for Deliveries and Access to Building)
- Offset PAR as needed to provide minimum 4-foot clear path around the hatch.
5. Fire Hydrant
- Locate outside PAR, typically in furnishing zone.
6. Accessible Parallel Parking
- Locate in most level area of block (recommended practice) to maximize usability.
- Provide 8 feet of space with 5-foot minimum obstruction-free access aisle adjacent to space for parallel parking.
- Sidewalk width narrows toward right-of-way to accommodate access aisle.
- Space and access aisle should have smooth surface for lift deployment. Minimize cross slope for lift operation.
7. Parking Meter for Accessible Space
- Locate at head of space or other nearby area with accessible connection to PAR and access aisle.
- Instructions visible from 40-inch height at center of clear approach area.
- Coin drop at 48-inch maximum height.
8. Clear Approach Area
- Minimum 30-inch by 48-inch obstruction free area centered on object being used (e.g. meter, phone).
- Slope area less than 2% in all directions.
- Space should be firm, stable, and slip-resistant.
9. Curb Ramp
- 4-foot wide (minimum) ramp.
- 1:12 maximum grade on ramp.
- Connect to PAR and to access aisle.
- Parallel type curb ramps required due to limited available right-of-way width.
- Landing can overlap PAR.
10. Driveway
- Maintain PAR elevation across driveway.
- To maintain less than 2% cross slope on the PAR, the ramped vehicular entry into the driveway must be split into two sections. Some of the required rise is accommodated between the curb line and the edge of the PAR; the balance is located on far side (non-street side) of the PAR. For the purposes of this illustration, it is assumed that the PAR can meet this elevation without adding curb ramps. If this is not possible, a solution similar to that shown in the 4- to 5-foot sidewalk model would be required.
- Provide good visibility and sight distance for pedestrians and vehicles.
- Detectable warnings should be provided only if driveway or alley is signalized.
11. Tree
- Avoid species known to produce surface roots, which may buckle sidewalk.
- Keep tree grates clear of PAR.
- Trim low hanging limbs to avoid creating protruding objects (hazardous especially to visually impaired pedestrians). Use species that do not obstruct sightlines for pedestrians and vehicle operators.
12. Bus Stop (No Shelter)
- Provide bus boarding and alighting area 5-feet wide by 8-foot deep (minimum from curb) for lift deployment.
- Connect waiting and boarding areas to PAR.
- If there is a bench, provide a 30-inch by 48-inch clear approach area adjacent to the bench and connected to bus boarding and alighting area.
- Keep signage from protruding into clear approach areas and/or PAR.
- Provide raised and Braille characters for route identification only (schedules, timetables, and maps are not required to have raised and Braille characters).
13. Landscaping
- Maintain appropriate sight distances. Use low ground cover and similar plantings so as to not obstruct sightlines for pedestrians and vehicle operators.
14. Sidewalk Furnishings, Trash Receptacle, and Similar Items
- Locate outside PAR.
- 30-inch by 48-inch clear approach area adjacent to furnishings.
- Trash receptacle openings within reach range requirements.
15. Telephone
- 30-inch by 48-inch clear approach area that may overlap with other clear spaces.
- Provide phone that complies with TTY and is accessible to wheelchair users.
Items Not Accommodated at this Width:
16. Bike Rack
MODEL SIDEWALKS
4- to 5-foot Curb to Right-of-Way Line

1. PAR (Pedestrian Access Route)
- 4-feet-wide minimum, 5-foot width recommended. If the PAR is reduced to 4-foot width, a passing space must be provided at a maximum of 200-foot intervals. Passing spaces can be located in bulbouts, recaptured landscaping areas, widened sidewalks, and other similar areas.
- No frontage or furnishing zone is provided.
2. Utility Pole/Street Light
- Locate outside PAR. Maintain minimum 4-foot-wide PAR.
- Locate as close to right-of-way as possible (outside recommended horizontal clearance to obstructions and with minimum impact on the PAR). An absolute minimum of 32-inch clear width is needed for passage around the obstacle.
3. Utility Meter/Underground Vault/Manhole
- Locate outside PAR wherever possible.
- When in the sidewalk area, grates and covers should have firm, stable, and slip resistant covers that are free from level changes.
4. Hatch (At-grade Access Door for Deliveries and Access to Building)
- When in the sidewalk area, covers should have firm, stable, and slip resistant covers that are free from level changes. This includes edges and hardware.
5. Fire Hydrant
- Locate outside PAR if possible or provide at
least 32 inches of clear width for passage around the hydrant.
6. Accessible Parallel Parking
- Locate in most level area of block (recommended practice) to maximize usability.
- Provide 8-foot space with 5-foot minimum obstruction-free access aisle adjacent to space for parallel parking.
- PAR ramps down to parking level in order to provide sufficient width for space.
- Space and access aisle should have smooth surface for lift deployment. Minimize cross slope for lift operation.
7. Parking Meter for Accessible Space
- Locate at nearby area with accessible connection to PAR and access aisle.
- Instructions visible from 40-inch height at center of clear approach area.
- Coin drop at 48-inch maximum height.
8. Clear Approach Area
- Minimum 30-inch by 48-inch obstruction-free area centered on object being used (e.g. meter, phone).
- Slope area less than 2% in all directions.
- Space should be firm, stable, and slip-resistant.
9. Curb Ramp
- 4-foot-wide (minimum) ramp.
- 1:12 maximum grade on ramp.
- Connect to PAR and to access aisle.
- Parallel-type ramps required due to limited available right-of-way width.
10. Driveway
- Maintain street elevation across the driveway width where PAR crosses. The PAR must ramp down to the street elevation in order to maintain less than 2% cross slope.
- Provide good visibility and sight distance for pedestrians and vehicles.
- Detectable warnings should be provided only if driveway or alley is signalized.
11. Tree
- Avoid species known to produce surface roots, which may buckle sidewalk.
- Keep tree grates clear of PAR.
- Trim low hanging limbs to avoid creating protruding objects (hazardous especially to visually impaired pedestrians). Use species that do not obstruct sightlines for pedestrians and vehicle operators.
Items Not Accommodated at this Width:
12. Bus Stop
- No adequate space is available for lift deployment. If a bus stop must be located in an area where sidewalks are this narrow, the stop should be located at a curb ramp and no parking zone where the lift can be safely deployed and passengers can access the PAR immediately. Keep signage from protruding into clear approach areas and/or PAR.
- Provide raised and Braille characters for route identification only (schedules, timetables, and maps are not required to have raised and Braille characters).
13. Landscaping
14. Sidewalk Furnishings, Trash Receptacle, and Similar Items
15. Telephone
16. Bike Rack
